播放mp4文件
先看效果。

这是一个很简单的mp4文件播放demo,为了简化,没有加入音频数据解析,即只有图像没有声音。
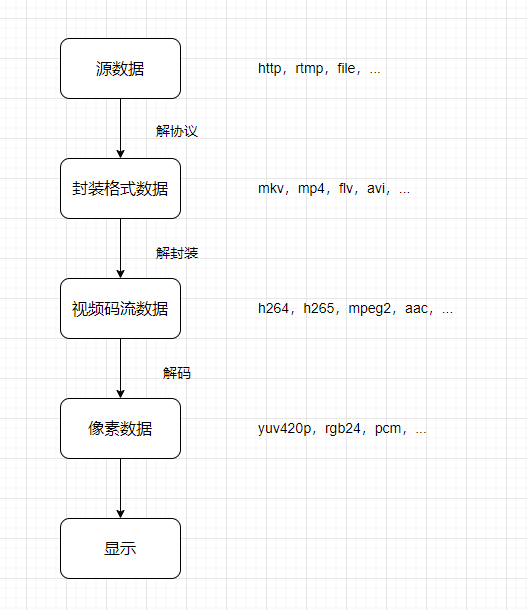
音视频源的播放可以概括为以下步骤:

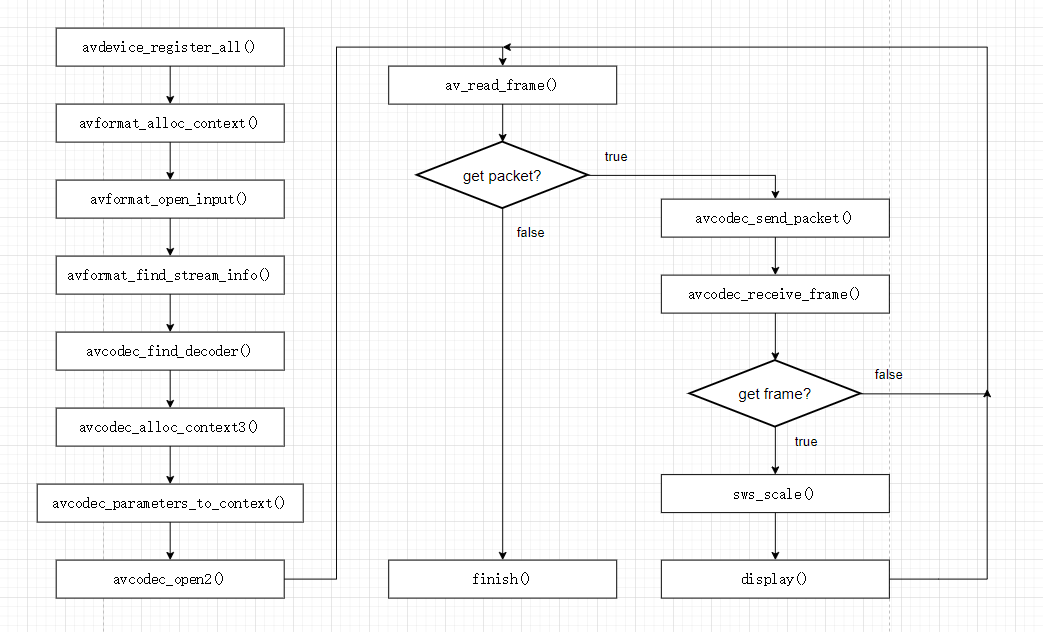
mp4文件也是源数据的一种,用FFmpeg解析mp4文件也遵循这个的过程,在函数层面的解析过程如下所示:

和上述流程对应的关键代码如下:
avdevice_register_all();
if(nullptr == (fileFmtCtx = avformat_alloc_context()))
{
    qDebug() << "avformat_alloc_context() failed";
    return;
}
QString playUrl = QCoreApplication::applicationDirPath() + "/test.mp4";
if (avformat_open_input(&fileFmtCtx, playUrl.toStdString().c_str(), nullptr, nullptr) != 0) {
    qDebug() << "avformat_open_input() failed";
    return;
}
if(avformat_find_stream_info(fileFmtCtx, NULL) < 0){
    qDebug() << "avformat_find_stream_info() failed";
    return;
}
for(size_t i = 0;i < fileFmtCtx->nb_streams;i++){
    if(fileFmtCtx->streams[i]->codecpar->codec_type==AVMEDIA_TYPE_VIDEO){
        nVideoIndex = i;
    }
}
if(nVideoIndex == -1){
    qDebug() << "nVideoIndex == -1";
    return;
}
encoderPara = fileFmtCtx->streams[nVideoIndex]->codecpar;
if(nullptr == (decoder = avcodec_find_decoder(encoderPara->codec_id)))
{
    qDebug() << "avcodec_find_decoder() failed";
    return;
}
if(nullptr == (decoderCtx = avcodec_alloc_context3(decoder))){
    qDebug() << "avcodec_alloc_context3 failed";
    return;
}
if(avcodec_parameters_to_context(decoderCtx, encoderPara) < 0){
    qDebug() << "avcodec_parameters_to_context() failed";
    return;
}
if(avcodec_open2(decoderCtx, decoder, NULL) < 0){
    qDebug() << "avcodec_open2 failed";
    return;
}
swsCtx = sws_getContext(decoderCtx->width, decoderCtx->height, decoderCtx->pix_fmt,
                        decoderCtx->width, decoderCtx->height, FMT_PIC_SHOW,
                        SWS_BICUBIC, NULL, NULL, NULL);
int numBytes = av_image_get_buffer_size(FMT_PIC_SHOW, decoderCtx->width, decoderCtx->height, 1);
showBuffer = (unsigned char*)av_malloc(static_cast<unsigned long long>(numBytes) * sizeof(unsigned char));
if(av_image_fill_arrays(showFrame->data, showFrame->linesize,
                        showBuffer
                            , FMT_PIC_SHOW, decoderCtx->width, decoderCtx->height, 1) < 0)
{
    qDebug() << "av_image_fill_arrays() failed";
    return;
}
packet = av_packet_alloc();
av_new_packet(packet, decoderCtx->width * decoderCtx->height);
int ret;
while(av_read_frame(fileFmtCtx, packet) >= 0){
    if(packet->stream_index == nVideoIndex){
        if(avcodec_send_packet(decoderCtx, packet)>=0){
            while((ret = avcodec_receive_frame(decoderCtx, decodedFrame)) >= 0){
                if (ret == AVERROR(EAGAIN) || ret == AVERROR_EOF)
                    break;
                else if (ret < 0) {
                    break;
                }
                sws_scale(swsCtx,
                          decodedFrame->data, decodedFrame->linesize,
                          0, decoderCtx->height,
                          showFrame->data, showFrame->linesize);
                QImage img(showFrame->data[0], decoderCtx->width, decoderCtx->height, QImage::Format_RGB888);
                emit imageReady(img);
                QThread::msleep(40);
            }
        }
    }
}
下面我们逐行解析。
avdevice_register_all();
avformat_alloc_context();
这是一些初始化工作,初始化所有组件并初始化一个AVFormatContext,AVFormatContext是一个非常重要的数据结构,它用于表示音视频封装格式的信息(封装格式是指将音频和视频流打包成一个单独的文件的方式,常见的封装格式包括AVI、MP4、MKV等)。AVFormatContext常用的关键成员有:
AVInputFormat *iformat: 表示输入格式,包括名称、版本等信息。AVOutputFormat *oformat: 表示输出格式,同样包括名称、版本等信息。unsigned int nb_streams: 表示媒体文件中流的数量。AVStream **streams: 一个指向AVStream结构体数组的指针,表示媒体文件中的各个流。AVIOContext *pb: 文件 I/O 上下文,包含了文件读写所需的信息。char *url: 文件路径。int64_t duration: 表示媒体文件的总时长。int bit_rate: 表示媒体文件的总比特率。AVDictionary *metadata: 元数据,包括标题、作者、编码器等信息。
QString playUrl = QCoreApplication::applicationDirPath() + "/test.mp4";
if (avformat_open_input(&fileFmtCtx, playUrl.toStdString().c_str(), nullptr, nullptr) != 0) {
    qDebug() << "avformat_open_input() failed";
    return;
}
打开一个指定的mp4文件,函数会根据文件的扩展名或文件头的特征来检测文件的格式,然后尝试使用相应的解封装器(Demuxer)来读取文件,一旦成功读取文件,会对AVFormatContext进行赋值。
我们可以在这之后打印我们上面提到的AVFormatContext关键成员信息。
qDebug() << "file name: " << fileFmtCtx->url;
qDebug() << "file iformat: " << fileFmtCtx->iformat->name;
qDebug() << "file duration: " << fileFmtCtx->duration << " microseconds";
qDebug() << "file bit_rate: " << fileFmtCtx->bit_rate;

for (unsigned int i = 0; i < fileFmtCtx->nb_streams; i++) {
    AVStream *stream = fileFmtCtx->streams[i];
    qDebug() << "Stream " << i + 1 << ":";
    qDebug() << "  Codec: " << avcodec_get_name(stream->codecpar->codec_id);
    qDebug() << "  Duration: " << stream->duration << " microseconds";
}
AVDictionaryEntry *entry = nullptr;
while ((entry = av_dict_get(fileFmtCtx->metadata, "", entry, AV_DICT_IGNORE_SUFFIX))) {
    qDebug() << entry->key << ": " << entry->value;
}
打印结果类似于下面这样的信息:
file name:  xxx/test.mp4
file iformat:  mov,mp4,m4a,3gp,3g2,mj2
file duration:  27696000  microseconds
file bit_rate:  0
nb_streams:
Stream  1 :
  Codec:  h264
  Duration:  2492584  microseconds
Stream  2 :
  Codec:  aac
  Duration:  1328128  microseconds
metadata:
major_brand :  mp42
minor_version :  0
compatible_brands :  isommp42
creation_time :  2018-07-18T01:30:16.000000Z
location :  +30.8214+111.0014/
location-eng :  +30.8214+111.0014/
com.android.version :  8.1.0
我们看其中一些信息:
mov,mp4,m4a,3gp,3g2,mj2代表AVFormatContext支持解析、读取和处理这些格式的媒体文件。
文件有2个流,1个h264视频流,1个aac音频流。
major_brand 和compatible_brands 是与 ISO 基本媒体文件格式(ISO Base Media File Format,简称 ISO BMFF)相关的信息,通常用于描述媒体文件的类型和兼容性。
metadata中是自定义的一些信息,可以看到还包含拍摄视频的Android版本信息。
if(avformat_find_stream_info(fileFmtCtx, NULL) < 0){
    qDebug() << "avformat_find_stream_info() failed";
    return;
}
调用 avformat_find_stream_info 函数后,AVFormatContext 结构体中剩下的一些字段将被填充,这些字段包含了有关媒体文件流的信息。在调用这个函数之前,AVFormatContext 中的一些信息可能是不完整的或未初始化的。比如上面打印的bit_rate是0,现在你能获得真实的bit_rate。
for(size_t i = 0;i < fileFmtCtx->nb_streams;i++){
    if(fileFmtCtx->streams[i]->codecpar->codec_type==AVMEDIA_TYPE_VIDEO){
        nVideoIndex = i;
    }
}
if(nVideoIndex == -1){
    qDebug() << "nVideoIndex == -1";
    return;
}
通过AVFormatContext->AVStream->AVCodecParameters->AVMediaType找到文件的视频流并记下流的索引。
codecPara = fileFmtCtx->streams[nVideoIndex]->codecpar;
获取编码器参数。
if(nullptr == (codec = avcodec_find_decoder(codecPara->codec_id)))
{
    qDebug() << "avcodec_find_decoder() failed";
    return;
}
通过编码器id获取对应的解码器。
if(nullptr == (decoderCtx = avcodec_alloc_context3(decoder))){
    qDebug() << "avcodec_alloc_context3 failed";
    return;
}
if(avcodec_parameters_to_context(decoderCtx, encoderPara) < 0){
    qDebug() << "avcodec_parameters_to_context() failed";
    return;
}
if(avcodec_open2(decoderCtx, decoder, NULL) < 0){
    qDebug() << "avcodec_open2 failed";
    return;
}
上面三个函数的意思是:初始化一个解码器上下文AVCodecContext。通过编码器的AVCodecParameters初始化解码器的AVCodecContext。初始化并打开解码器。
通过这3个函数,我们已经具备解码的条件。
swsCtx = sws_getContext(decoderCtx->width, decoderCtx->height, decoderCtx->pix_fmt,
                                     decoderCtx->width, decoderCtx->height, FMT_PIC_SHOW,
                                     SWS_BICUBIC, NULL, NULL, NULL);
配置一个SwsContext,用于图像颜色格式转换和缩放。这里是针对解码后的图像和显示的图像,通常是需要经过一次转换。
第1~3参数代表输入图像的宽度、高度、像素格式,第3~6参数代表输出图像的宽度、高度、像素格式。第7个代表颜色格式转换和缩放的选项。
输入像素格式就是我们mp4文件视频流的格式,我们可以打印出来看看(打印结果是yuv420p)。输出的格式是我们自定义的,这里我们定义成AV_PIX_FMT_RGB24。SWS_BICUBIC代表双线性插值。
qDebug() << "decoderCtx->pix_fmt:" << av_get_pix_fmt_name(decoderCtx->pix_fmt);
//输出
//decoderCtx->pix_fmt: yuv420p
int numBytes = av_image_get_buffer_size(FMT_PIC_SHOW, decoderCtx->width, decoderCtx->height, 1);
showBuffer = (unsigned char*)av_malloc(static_cast<unsigned long long>(numBytes) * sizeof(unsigned char));
if(av_image_fill_arrays(showFrame->data, showFrame->linesize,
                        showBuffer, FMT_PIC_SHOW, decoderCtx->width, decoderCtx->height, 1) < 0)
{
    qDebug() << "av_image_fill_arrays() failed";
    return;
}
av_image_get_buffer_size计算了计算图像数据的缓冲区大小。av_malloc分配了1个内存块给showBuffer。av_image_fill_arrays用图像参数和showBuffer初始化AVFrame的data和linesize成员,并且让AVFrame和showBuffer关联。
av_image_fill_arrays有2个关键参数:
uint8_t *dst_data[4]指针数组,包含了指向图像数据平面的指针。在图像处理中,图像通常被分解为不同的平面,每个平面都包含了一定的信息,例如亮度(Y)、色度(U、V)等。
dst_data[0]通常指向亮度平面,而dst_data[1]和dst_data[2]则分别指向色度平面。dst_data[3]可能用于 alpha 通道,具体取决于图像格式。在大多数情况下,RGB图像只有一个平面,因此通常会传递一个大小为4的数组,但只使用第一个元素(dst_data[0])。int dst_linesize[4]整数数组,包含了对应平面的每行的字节数。图像的每个平面都是通过一系列的字节来表示的,
dst_linesize[0]表示亮度平面每行的字节数,而dst_linesize[1]和dst_linesize[2]则分别表示色度平面每行的字节数。dst_linesize[3]可能用于 alpha 通道。
av_read_frame(fileFmtCtx, packet) >= 0
从文件中读取一个数据包AVPacket,一个AVPacket的载荷是编码器输出的一个编码后的单元,可以理解为UDP协议中的分包。
avcodec_send_packet(decoderCtx, packet)>=0
将AVPacket送入解码器进行解码。
ret = avcodec_receive_frame(decoderCtx, decodedFrame)) >= 0
尝试从解码器中接收已解码的视频帧,并将接收到的帧数据存储在decodedFrame中,因为一个AVPacket不一定能解码出一帧图像,所以avcodec_receive_frame是有可能返回失败的。
sws_scale(swsCtx,decodedFrame->data, decodedFrame->linesize,
                              0, decoderCtx->height,
                              showFrame->data, showFrame->linesize);
将decodedFrame中的数据从一个颜色空间(YUV)转换为另一个颜色空间(RGB),并按需求对图像进行缩放操作。
QImage img(showFrame->data[0], decoderCtx->width, decoderCtx->height, QImage::Format_RGB888);
emit imageReady(img);
QThread::msleep(40);
最后我们生成QImage并用信号发出显示,处理一张图片的间隔是40ms,也就是产生25帧/秒的视频。